How to setup and use OpenVPN
Tired of useless VPN clients? Maybe you need this
The easiest way to connect to any VPN is to use its own software clients. There's no tricky setup required, or complicated settings to think about – typically you can just install and go.
But custom clients can have problems, too. Clumsy interfaces, annoying notifications, barely any settings, wasted system resources – they could even just stop working for no apparent reason.
You may not have to live with this, as the VPN provider’s client isn’t necessarily your only option. If your VPN supports the OpenVPN protocol, there's a good chance you can also use the service with OpenVPN's free open source client. In fact, most provider clients use it already to make and manage connections (in Windows, search your client folders for OpenVPN.exe).
This won't work for everyone. Switching to OpenVPN will probably mean you'll lose access to any advanced service extras. If your provider supports ad blocking, Tor over VPN or application-specific kill switches, for instance, these will disappear if you switch to another client.
But on the plus side, you'll get a simpler interface, and a completely editable server list, which can include locations from different VPN providers. Other benefits include reduced RAM requirements, in-depth expert-level control of connection settings, and detailed logs to help with troubleshooting.
Unsure? You can generally install both on the same system. Keep your provider's client for simple tasks, maybe save OpenVPN for troubleshooting or anything more complicated – it's your call.
It won't take long to get started, either. Most users should have OpenVPN up and running within 30 minutes, and it'll often take less time than this.
Configuration files
OpenVPN is a powerful package, but it won't be able to connect to your VPN until it has all the necessary configuration files, the settings which define how each connection should work. Some services make these hard to find, and a few don't give you any at all, so we would recommend checking your VPN's website before you do anything else.The best providers have OpenVPN setup tutorials which not only mention configuration files, but also show you how to use them. Good examples include ExpressVPN, IPVanish, IVPN, NordVPN, Private Internet Access and VyprVPN.
Others may not have any setup guides, but still provide the files for those who need to use them. Search the Support pages for references to OpenVPN or OVPN files.
A few services hide the files away in a web management console. If you've created an account with a VPN provider, log in and browse the pages for OpenVPN setup files.
When you're done, check your downloaded files and unzip any archives. You're looking for multiple OVPN files, one for every server you'd like to access. There may be other files, too, but as long as you've got the OVPN data, you should be ready for the next step.
Getting started
The latest build of OpenVPN is always available at the official website. Go to OpenVPN.net and click Community > Downloads. The release notes for the latest build will appear at the top of the page, and if you scroll down you'll find a link to download the Windows setup file.We're covering Windows installation here, but the process is very similar for other operating systems. Check out the Android build and the iOS version for more.
Launching the installer displays a very standard setup wizard. Agree to the licence, accept the default 'components to install', optionally choose a new destination folder, and click Install to complete the process.
Once setup has finished, a plain text Quick Start Guide should pop up in Notepad (or your preferred text file viewer). Read it if you're interested in the technical details, but otherwise it's safe to close the file for now. Browse to the OpenVPN\Doc folder if you'd like to check it out later.
Import VPN data
Launch the 'OpenVPN GUI' application and it adds an icon to your system tray. Despite the GUI in the program name, that's all you get – there are no fancy maps or graphics here.
Find the OVPN configuration files you downloaded earlier and copy them to the OpenVPN config folder (\Users\Name\OpenVPN\Config or \Program Files\OpenVPN\config).
Beware: OpenVPN supports a maximum of 50 servers, potentially a major annoyance if your provider has thousands. If you're unsure, copy just a few that you know you'll use, and you can always delete some of those or import others later.
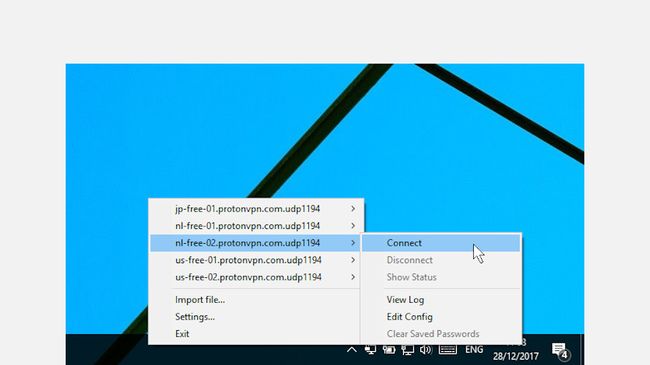
When you're done, right click the OpenVPN system tray icon and the names of the files you copied should be listed on a menu.
Names are sorted alphabetically, so feel free to rename the files to suit your needs, maybe with the most commonly-used at the top.
Log in
Right click the OpenVPN icon, choose a server you'd like to access and click Connect.
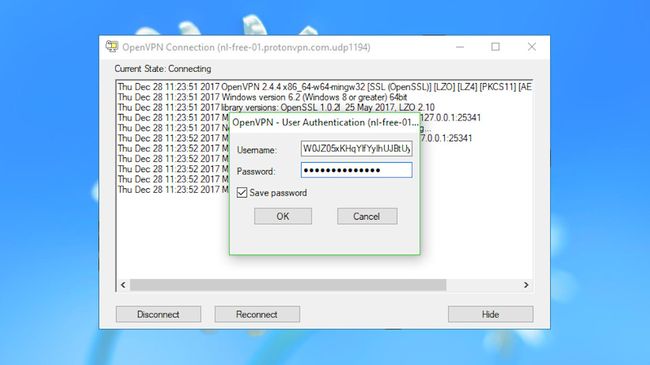
A log screen should appear with a few initial status commands, followed quickly by a request for your username and password.
Enter your credentials, and if everything has worked as it should, the log screen will disappear within a few seconds, and a desktop notification will say that you're connected.
The OpenVPN icon shows a green screen to confirm you're protected, and if you hover your mouse over it, a tooltip displays the name of the connected server and your new IP address.
If you're the skeptical type and need more reassurance, point your browser at ipleak.net to make sure you really do have a new IP, and that it's where you think it is, and there are no DNS leaks or other oddball issues.
When you're happy that everything is running smoothly, right click the OpenVPN icon again, select the checked server and click Disconnect.
Settings
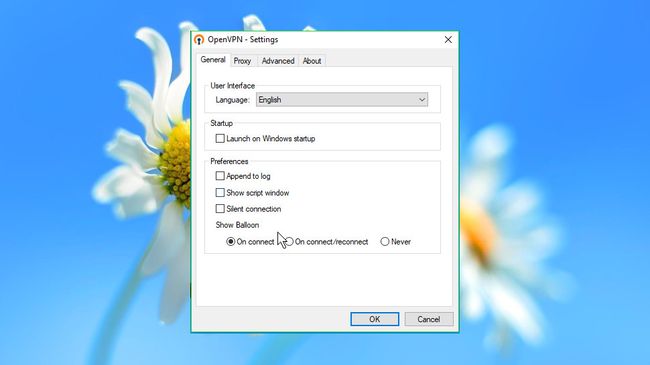
OpenVPN only has a few program settings, but you might find one or two of them useful. Right click the OpenVPN icon and select Settings to take a look.
Check the ‘Launch on Windows startup’ box to ensure OpenVPN is always available when you need it.
Check ‘Silent Connection’ and you won't see the log screen appear when you connect.
Select ‘Never’ if you don't want to see desktop notifications. Be careful, though: it's important to know when the VPN is protecting you, and when it isn't.
Experts can set up OpenVPN to use their preferred HTTP or SOCKS proxy, and you can configure some key program folders and other settings on the Advanced tab.
Going further
Even the simplest OpenVPN installation has some immediate advantages. There's no need to have a bulky VPN client permanently running in the background. The server list can be edited and reorganized as you like, so you won't have to scroll through 30 servers to find the only two you ever use. And if you have any connection issues, OpenVPN's logs are also available to help you figure out what's going wrong.
That's just the start. Experienced users can go much further by tweaking the connection settings in their OVPN files, and getting in-depth low-level control over how the VPN works.
Open one of your OVPN files in WordPad to see its various commands. You might see lines like this:
proto udp
remote us-techradarvpn.com 1194
tun-mtu 1500
As you'll probably guess, the proto command sets your preferred protocol. Normally it's UDP for speed, but replace it with TCP and OpenVPN will use the more reliable TCP protocol next time (at the cost of some performance).
The remote line tells OpenVPN the name of the VPN server and the port you'd like to use. This is useful if you would like more details on the destination server, or would like to try an alternative port, although of course you'll need to find out which ports the server supports first.
The tun-mtu command sets the Maximum Transmission Unit value. Tweaking this can make a real difference to performance in some situations, although it's best left alone unless you know what you're doing.
Experienced users can take advantage of many other options. You can run scripts when the VPN connects or disconnects, for example, to ensure programs only launch when the VPN is connected. A Redirect command controls which traffic you'd like to run through the tunnel, and you can take action to block DNS leaks. Check the documentation in the \Program Files\OpenVPN\doc folder to see exactly what's on offer.


Add Your Comments